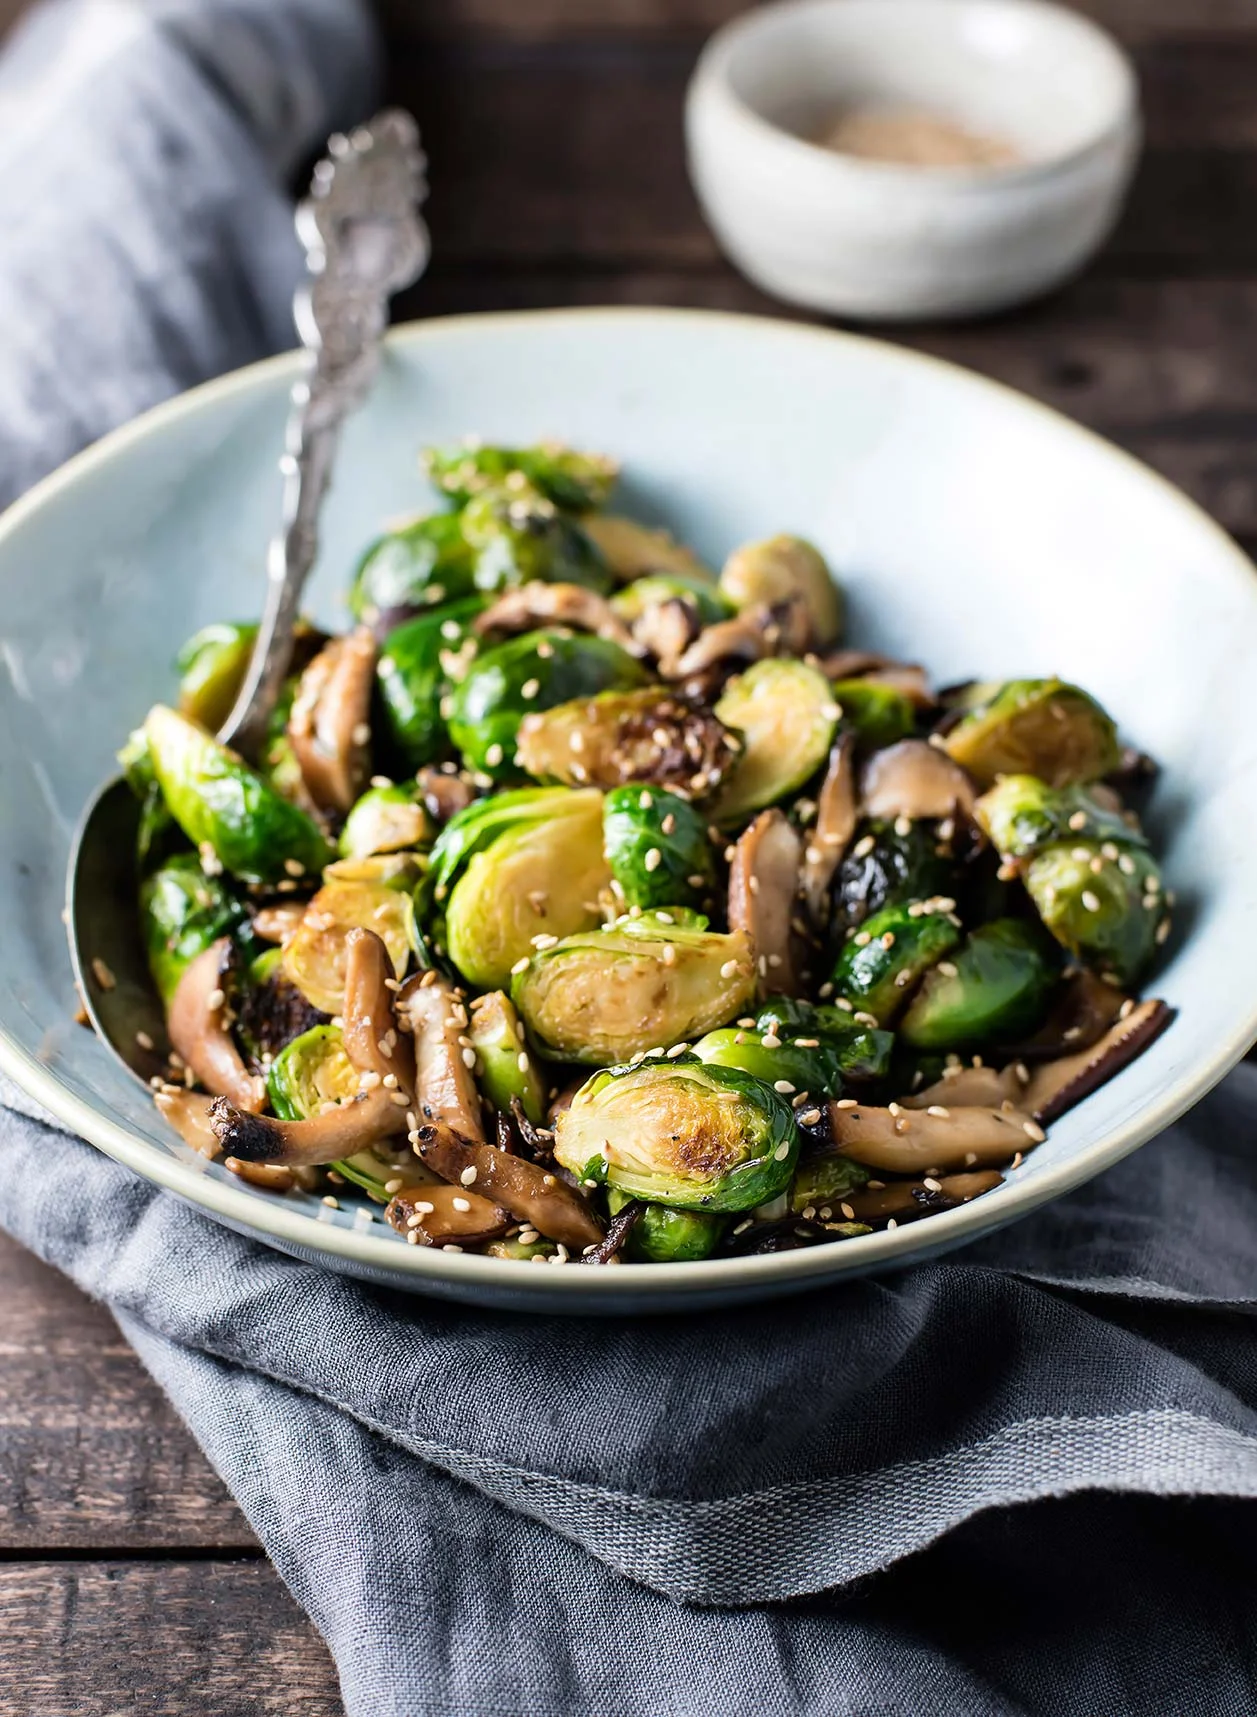
Brussels Sprout & Mushroom Stir Fry

Brussels Sprout & Mushroom Sesame Stir Fry

Part of me hates going to Costco: to lines, the people, the hustle and bustle. But part of me loves it: the fridge full of organic veggies when we get home, frozen wild fish fillets that I can cook into fish tacos all month long, and giant jars of peanut butter (always). 

Brussels sprouts and mushrooms are two things I almost never leave Costco without. As far as vegetables go, they stay good in the fridge for a while, and we always go through them all. Costco trips mean recipes like this: Brussels Sprouts and Mushroom Sesame Stir Fry.

Brussels Sprout & Mushroom Sesame Stir Fry

Toasted sesame oil is one of my favorite condiments because it’s depth of flavor adds so much to any Asian-style dish! Along with a drizzle of soy sauce and a spoonful of maple syrup? That’s where the magic happens. It’s a sweet, savory, nutty combination that goes with just about anything.

I use shiitake mushrooms in this recipe because they work well in recipes that have Asian flavors (like soy and sesame). If you can’t find shiitake mushrooms, baby portobellos will work just fine!

After you’ve made this recipe with brussels sprouts, you might find that the sauce is extremely adaptable — you could do this same exact thing with broccoli or zucchini.

Brussels Sprout & Mushroom Sesame Stir Fry

Brussels Sprout & Mushroom Sesame Stir Fry

Published March 15, 2018 by

Serves: 4   |    Total Time: 20 minutes


Ingredients:

  • 2 cups brussels sprouts, halved
  • 2 cups mushrooms, sliced (I used shiitake but cremini mushrooms also work well)
  • 1 tablespoon coconut oil 
  • 1 tablespoon minced garlic
  • 2 tablespoons soy sauce 
  • 1 tablespoon maple syrup
  • 1 tablespoon toasted sesame oil
  • 1-2 tablespoon sesame seeds 

Directions:

  1. Heat oil in a wok or skillet over medium heat until it glistens. Add mushrooms and brussels sprouts to the pan, stirring briefly.
  2. Allow veggies to cook for 10 minutes, stirring ocassionally. Mushrooms should begin to soften and brussels should start to brown just on the edges. Add minced garlic to the pan, and cook for 3 more minutes, stirring every minute or so.
  3. Drizzle soy sauce, maple syrup, and sesame oil into pan and stir. Cook for 3 more minutes. Add sesame seeds to taste, and remove from heat. Serve hot!

3 Comments

One Pan Paleo Chicken Cacciatore

Camera Update: I got my new camera in mail yesterday! I’m over the moon. I’ll be returning to the regular posting scheduling shortly, now what I can shoot! 

Now... on to this delicious dish! 

I’ve been on a re-working streak: revisiting old favorites from the blog and taking new pictures (like this Chicken & Sweet Potato Curry, or this Lemony Garden Vegetable & Chicken Soup). It takes some of the mind-work out of the equation, leaving me to only do the creative pieces: photography, a bit of writing, quite a lot of eating. 

This one-pan chicken cacciatore is one of those revisited recipes. I originally made this recipe when I was in the middle of finals for grad school. It feels like a lifetime ago. At the time, exams, essays, and textbooks took up such a large part of my life it was hard to believe it could be any other way. In retrospect that was a short lived moment in my journey, one that I even forget about most of the time. All the better, as my experience with grad school was unremarkable. 

One Pan Paleo Chicken Cacciatore

When I first published this recipe I had said, "I need meals that are simple, quick, and take a minimal amount of brain work.” But I was also looking for ways to express myself creatively, something multiple choice tests didn’t allow. It's that creative need that comes through in this recipe, inspired by a single night out at Pasta Jay’s on Pearl Street. 

I remember—not the exact dish I had eaten at Pasta Jay’s- but the thoughts that ran through my head when I ate the leftovers out of a cardboard to-go box the next day. The dish awed me, to be honest. I had never had anything but pasta-laden dishes from Italian restaurants before (to be expected), but this dish had no pasta, and was the best thing I’d eaten that month. 

I ate that meal in 2011 and originally wrote up this recipe in 2015. It’s now been 7 years, and that first introduction to cacciatore stays with me.

Making cacciatore is a bit of a production: if you really want to impress people, you’ll need to get fresh basil, and there are a few things you’ll need to chop. Oh, but it’s worth it. Since I’m usually making this on a weeknight, after running errands or getting a workout in, I try to chop everything ahead of time (in the morning, or the night before). I’ll even measure out the spices and put them in a bowl, so that when evening rolls around I don’t even have to think. Just put things in the pot (I use a blue Le Creuset Braiser for meals like this) and remember to stir occasionally! 

One Pan Paleo Chicken Cacciatore

One Pan Paleo Chicken Cacciatore

Published February 27, 2018 by

Serves: 4   |    Total Time: 60 minutes


Ingredients:

  • 1 pound bone-in chicken thighs (boneless and skinless is fine too, just reduce cooking time - cook thighs until internal temperature reaches 185°F)
  • 1 teaspoon coconut oil
  • 1/2 medium white onion, sliced
  • 3 cloves garlic, minced
  • 2 bell peppers, sliced in strips (choose a variety of colors: yellow, red, or green)
  • 1/4 cup red wine, such a Pinot Noir or Sirah
  • 2 14.5-ounce cans of crushed tomatoes
  • 1/2 cup canned artichoke hearts, drained and quartered 
  • 1 teaspoon balsamic vinegar
  • 1/4 cup fresh basil leaves, sliced chiffonade style style, plus more for garnish
  • 1/2 teaspoon red pepper flakes 
  • 1/2 teaspoon dried oregano 
  • 1/2 teaspoon dried thyme 
  • 1/4 teaspoon salt
  • 1/4 teaspoon ground black pepper
  • Optional for serving: grated Parmesan Reggiano cheese, red pepper flakes, extra basil leaves

Directions:

  1. Heat the coconut oil over medium-high heat in a large skillet (I use my 5-qt Le Creuset Braiser, though a 13 to 15 inch skillet would work as well). Once the oil glistens, place chicken thighs skin-side down in the pan. Sear the chicken for 3 minutes, then flip them over and continue to cook chicken for 5 more minutes.
  2. After 5 minutes, place the onions, garlic, and peppers in pan. Cook, stirring occasionally, until the onions are translucent. Add the wine, and scrape the pan with a wooden spoon. Bring to a simmer.
  3. Pour in the tomatoes, and stir in the artichoke hearts, balsamic vinegar, basil, thyme, red pepper flakes, oregano, salt and pepper.
  4. Bring back up to simmer, and place lid on pan. Cook, for 20-30 more minutes, until an instant read thermometer reads 185°F when inserted into the center of the thickest thigh.
  5. Remove from heat, and serve on plates or in bowls. Garnish with grated parmesan, red pepper flakes, and/or extra basil.
  6. Tip: try serving this over spiralized zucchini or spaghetti squash for a grain-free pasta option.

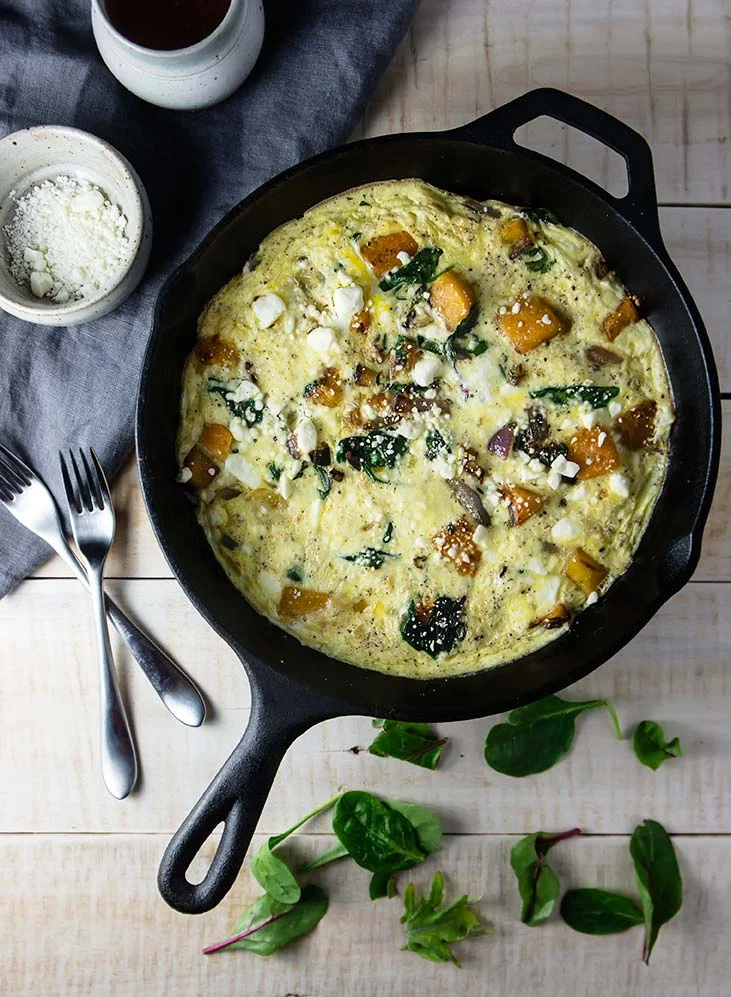
Butternut Squash, Power Greens & Red Onion Frittata

Butternut Squash, Power Greens & Red Onion Frittata

Perfect for two, this frittata is full of the good stuff: butternut squash, power greens, red onion and feta.

Selfishly, this breakfast is a mash up of things I love. For one, frittatas are pretty much my favorite breakfast. And winter squash is one of my all-time favorite crops. But also, it's easy to make, delicious, and good for you too! Something others will love as much as I do, especially if you're into eggs for breakfast. Frittatas are a go-to weekday breakfast for me because I can whip them up before heading out the door to work. If I need to, I place two slices into a pyrex and eat it when I get to the office, but usually that isn't necessary, and I enjoy my breakfast with a latte and an overdose of blog to-dos. 

Butternut Squash, Power Greens & Red Onion Frittata

Once you've made a few frittatas, you're pretty much set for life. Start with a recipe, but after a few successful bakes, let your creativity loose. This Butternut Squash, Power Greens & Red Onion Frittata is perfect for serving 2 people (or 4 along with a side of fruit and yogurt), but you can make big batch frittatas too. If you're serving a crowd, try this Broccoli & Pepper Jack Frittata.

Have a few frittatas under your belt? Good. Now wing it. This blog is all about helping you eat well, and making a frittata when the kitchen seems to be empty is one breakfast trick I always keep up my sleeve. 

How To Make Any Type of Frittata: 

Note that the recipe for this exact frittata is below, so keep scrolling if you want a little more guidance!

  • Start with an oven-safe skillet (the oven-safe part is important!). Heat 1 teaspoon of oil in the skillet until it glistens.

  • Add vegetables. Let's say 1 to 2 cups of sliced veggies. Anything you like -- potatoes, broccoli, spinach, zucchini, etc. Sauté, stirring occasionally, until veggies are tender.

  • In a medium bowl, combine 4 eggs, salt, and pepper. I like to add a splash (just a splash) of milk but this is optional. Whisk until frothy.

  • Pour egg mixture into skillet. Sprinkle a bit of shredded cheese on top. Just a single layer.

  • Place skillet in oven, and turn broiler to high. Keep an eye on the frittata - it will get puffed up, and start to turn golden. Remove from oven and allow to cool for 5 minutes. Eggs should be set. Slice and serve. (Note: for a large frittata for a crowd, you'll need more time in the oven at a lower temperature to get it cooked through. Try this Denver Omelette Casserole which is basically a glorified frittata).

Butternut Squash, Power Greens & Red Onion Frittata

Butternut Squash, Power Greens & Red Onion Frittata

Published February 27, 2018 by

Serves: 2   |    Total Time: 25 minutes


Ingredients:

  • 1 tablespoon butter
  • 1/2 red onion, diced
  • 1 cup diced butternut squash (peeled and seeds removed)
  • 1 clove garlic, minced
  • 1 cup power greens, packed
  • 4 eggs
  • 1/4 cup milk of choice
  • 1/8 teaspoon salt
  • 1/8 teaspoon ground black pepper
  • 1/4 cup feta cheese crumbles

Directions:

  1. Heat butter in an oven-safe 8-inch skillet until melted. Add red onion to the skillet, and sauté for 3 minutes, stirring occasionally. Add diced butternut squash and cook for 10 more minutes, stirring every minute or so to ensure even cooking.
  2. Add garlic and greens to the pan, and cook for about 3 minutes. After 3 minutes, greens should be wilted, and butternut squash should be tender all the way through.
  3. In a medium sized mixing bowl, combine eggs, milk, salt and pepper. Whisk until bright yellow and frothy.
  4. Pour egg mixture into skillet, using a spatula to ensure the squash and greens are evenly distributed. Then, sprinkle feta over top.
  5. Turn oven to high on the “Broil” setting with rack in the top position. Place skillet in oven, uncovered, and bake for about 7-minutes. Watch closely in this step, as some broilers may run hotter than others. You are looking for the top to be puffed up and golden, but not brown. Remove from oven and allow to cool for about 3 minutes before slicing and serving. Egg should be set through (if it is not, leave it until the broiler a few more minutes).

2 Comments